How to use Abbott's Freestyle Libre Pro
The Libre Pro is an FGM - Flash Glucose Monitor, one of the cool new tools for diabetics to study trends and measure blood glucose. It is primarily a healthcare provider device, meaning that your doctor fixes it for you, you wear it 'blind' (without knowing what your current sugars are) and in two weeks you get your reports, including the AGP - Ambulatory Glucose Profile, which is a visual graph of your readings.
In countries like India, where the consumer version 'Libre' is not available yet and CGM options are limited and expensive, a lot of people make do with the Libre Pro for everyday use. I have been using the Libre Pro continuously for the last few years and I'm going to share some basic tips and tricks and show you how to make the most of the tools available to us.
Irrespective of whether you use CGMs (Continuous Glucose Monitors) or FGMs, it is important to regularly cross check against your glucometers (at least twice a day if not more often) to make sure you are on track and that you are not making dosing or correction decisions based on inaccurate data.
Having said that, another thing to keep in mind is that CGMs and FGMs measure glucose in the interstitial fluid of the blood whereas a glucometer measures the glucose levels in capillary blood. What this means is that there will always be a possibility of a lag or difference in both readings, especially when glucose is rapidly changing, such as after meals or during exercise. Don't sweat it if your glucometer and Libre do not match exactly (they do match if your BG is stable). Here is a short video that explains the concept.
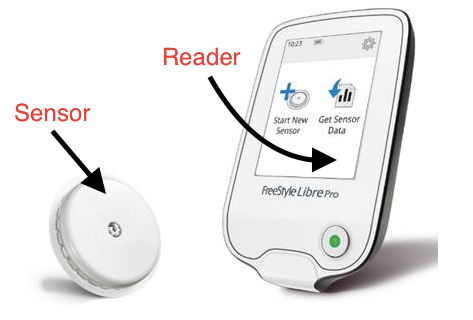
In the picture below, is the sensor which is a coin sized device that stays on the back of your arm for two weeks. A small filament, 5mm long stays under your skin for this duration and measures and records glucose readings automatically every 15 minutes. The reader is essential to activate a new sensor. The reader can also generate reports from a sensor that has already been used.
Have you had some diabetes humour lately? Telling curious people it's my WiFi hotspot elicits a lot of strange reactions!
Getting started
If you have decided you want to use the Libre Pro, get in touch with your doctor and/or diabetes community to find your local Abbott representative. Applying the sensor is pretty simple. Here is a quick video that shows you how to apply a sensor so that you need not depend on anyone to apply one for you.
Usage
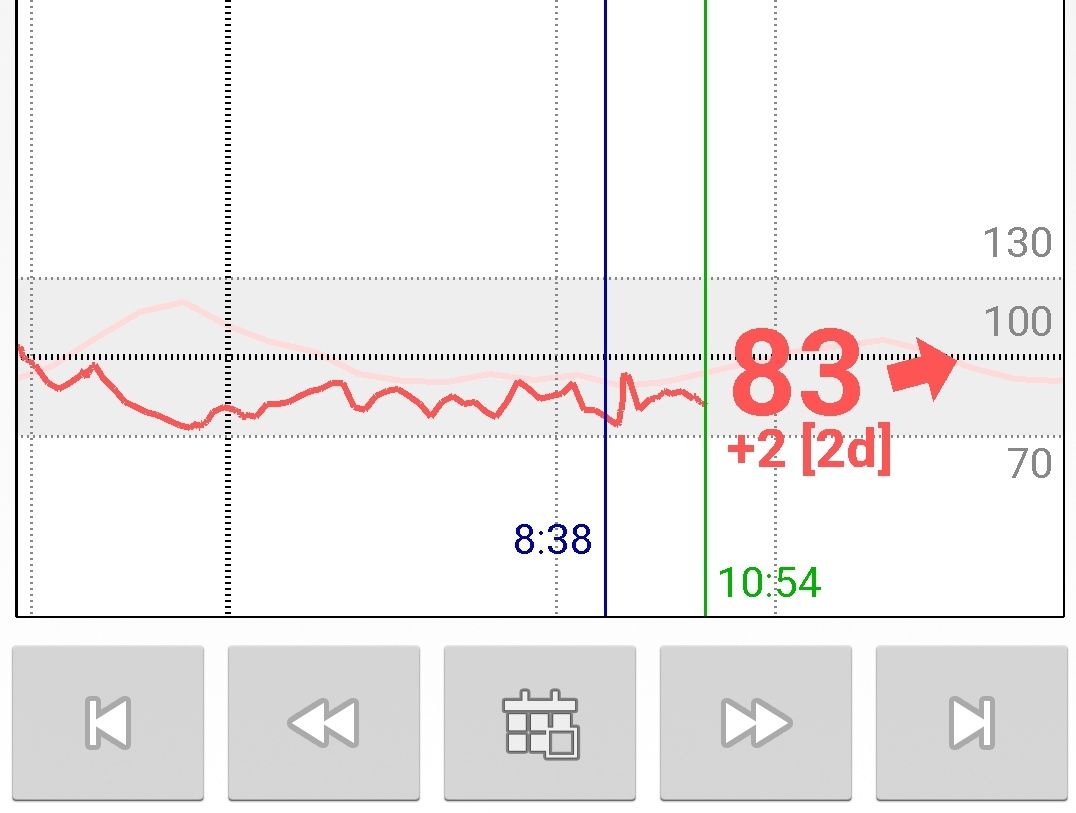
There are two ways to read the sensor data live during the two week period : the reader or your phone. The Libre Pro reader shows only graphs of your BG and not the actual number, whereas certain NFC enabled Android phones (NFC stands for Near Field Communication and can be found under Settings in your phone) with third party apps such as Glimp show graphs as well as actual values, which is definitely more useful.
What's even cooler is that you can sync Glimp with the Blue Circle Diabetes app & get a whole lot of additional features like reports and being able to add 'followers' to see your live sugars (especially helpful for hypo/hyper alarms if you're using it with the Miao Miao 2)
To scan with the reader, hold the back of the reader close to the sensor and you will see the updated graph on the screen (that is how FGMs work - you have to manually scan the sensor with your reader or phone to get a reading. When it updates automatically, without having to manually scan, it's a CGM). Here's the User Manual for Glimp incase you need to troubleshoot. Make sure you have set up Glimp correctly.
Since Libre is factory calibrated, you cannot calibrate a reader, however you can calibrate Glimp if you find the values between Glimp and glucometer too far apart.
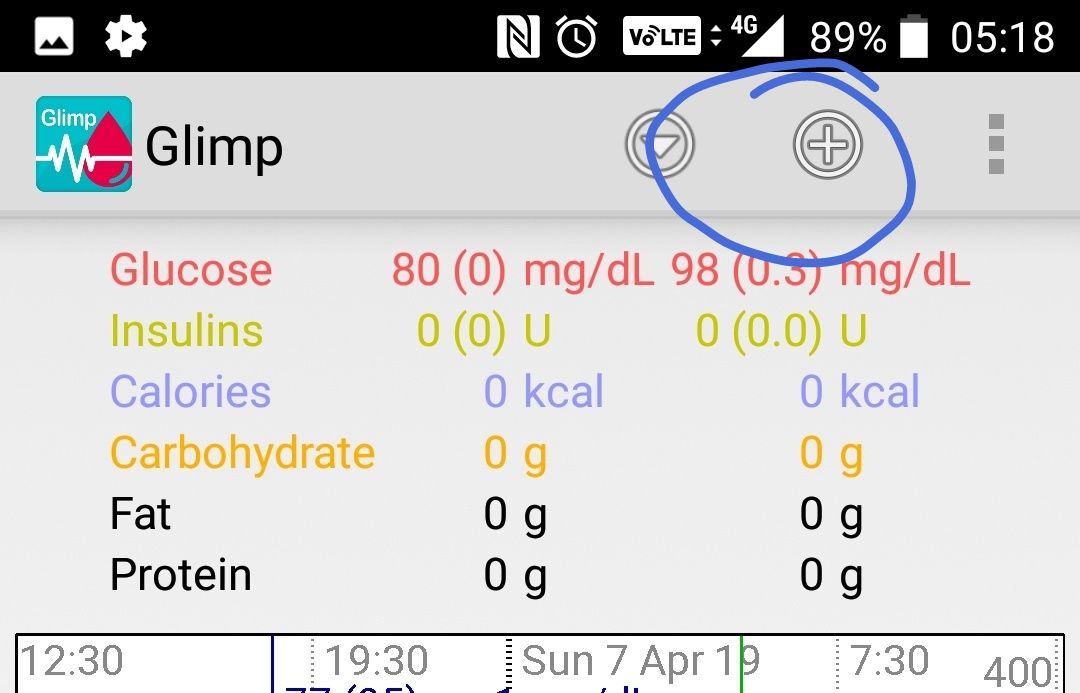
How to calibrate Glimp
Press the '+' symbol, like in the picture below, manually enter the current glucometer reading and save by pressing the floppy disk symbol. Tip: Always calibrate when BG is steady and not fluctuating too much (no active bolus). Also do not calibrate too often, especially if the readings are not too far apart. Usually a couple of calibrations in the first two days of a sensor are enough but use your discretion.
How to scan with your phone
Look up where your phone's NFC is located and hold that area against or close to the sensor. Ensure NFC and Glimp are turned on. Hold for a few seconds (or little longer if it's the first time) and you should hear two beeps or vibrations and be able to see the updated BG like I did in the video below!
Compatible phones
Here is a crowd sourced list of Glimp compatible phones. Do let us know if you have a compatible phone and it does not feature on our list yet, we will add it. It is advisable to physically test with a sensor before you buy a phone. Check if your phone is on the compatible list here.
LG G3 D855 / LG watch urbane 2nd ed / LG watch urbane/LG Q7/ Samsung galaxy A3 GT-S7270/SM-A300/ S3 GT-I9300/S3 NEO GT-I9301/S4 GT-I1905/S4 MINI GT-I9195/S7 EDGE SM-G935/S8/ Samsung A3/A5/A7/A9/A9 Pro/Samsung A50S/Samsung A51/Samsung A31/Samsung M40 / Samsung M51 / All Edge phones/Note 3/4/5/7/9/Note Edge/J7 2016 & 2017 / One Plus 3T/5/5T/6/6T/7/Motorola X Play/Lenovo X3A40/Motorola G5 Plus/ Moto G9 / Motorola One / Moto AndroidOne / Nokia 3 TA1032 /Xiaomi MI 5 /Nokia 6.1 / Nokia 7.1 /Huawei Mate 20 Pro / Realme X2 Pro

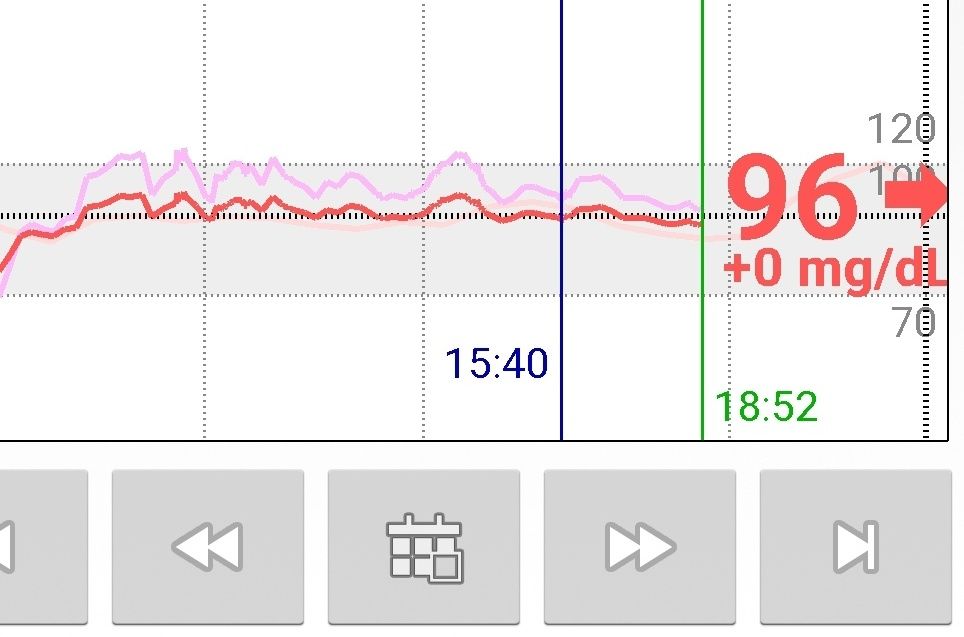
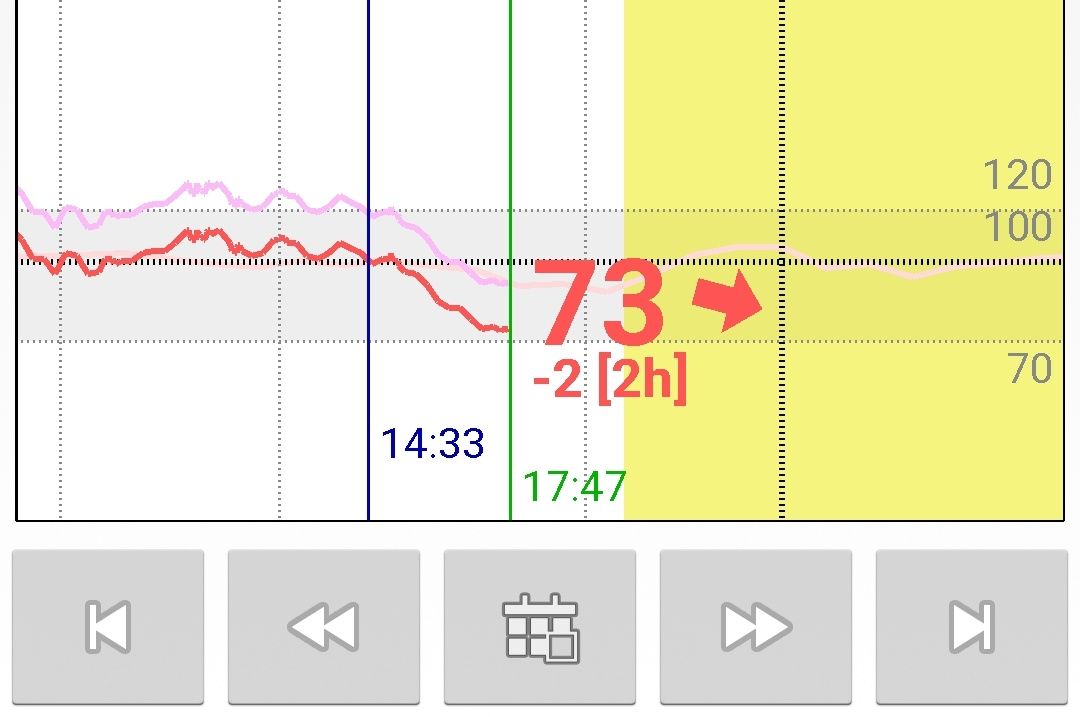
One of the things that a glucometer does not do is give you arrows or trends of whether sugars are going up, down or are stable. It just gives you a number. I cannot imagine not having the benefit of looking at my arrows now that I'm used to seeing it all the time, it's very empowering.
Reports
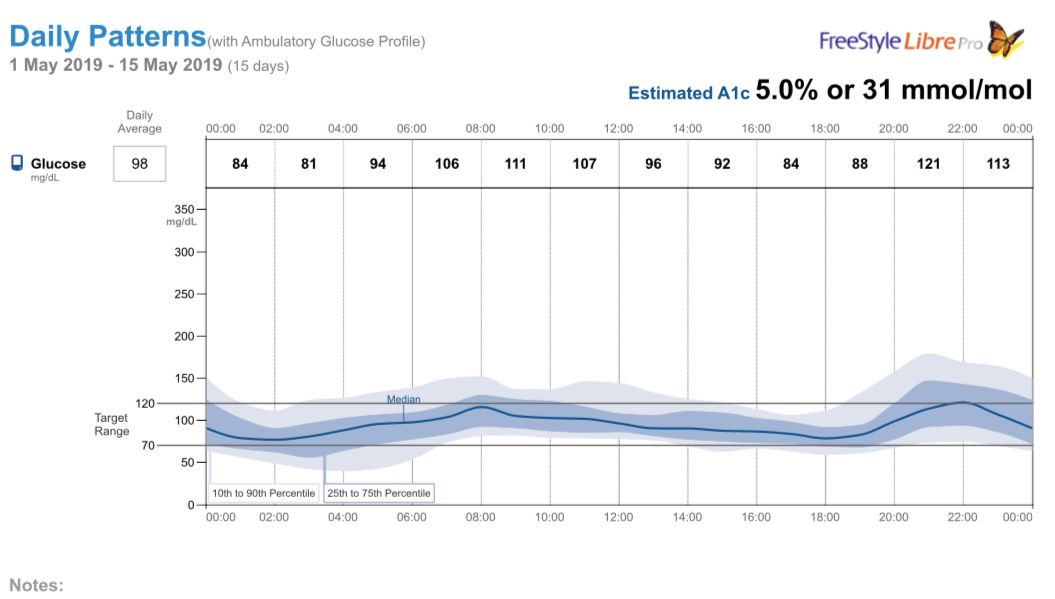
The reader gives you two kinds of reports, the AGP (the graphs, see picture below) as well as a lesser known report - the actual BG data every 15 minutes for all 14 days.
How to generate 'reader' reports: All you need to do is press 'Get sensor data' on the reader and hold it close to the used sensor. Download the Freestyle Libre Pro software onto your computer. Plug the USB cable into your computer and connect it to the reader. The software opens up when you do so. When you click on 'View Reports' it generates a report of this kind :
Here is a lesser known report - go to 'Export Data' and it would give you a report like this where you can see actual BG values recorded every 15 minutes over a period of two weeks :

However, keep in mind that these are reports generated by the reader and if you have been using Glimp and calibrating it, the results could be slightly different.
How to generate 'phone' reports (Glimp) :
Go to the website Glimp for web, follow the instructions and it's pretty simple to get your data in a very basic, barebones format.
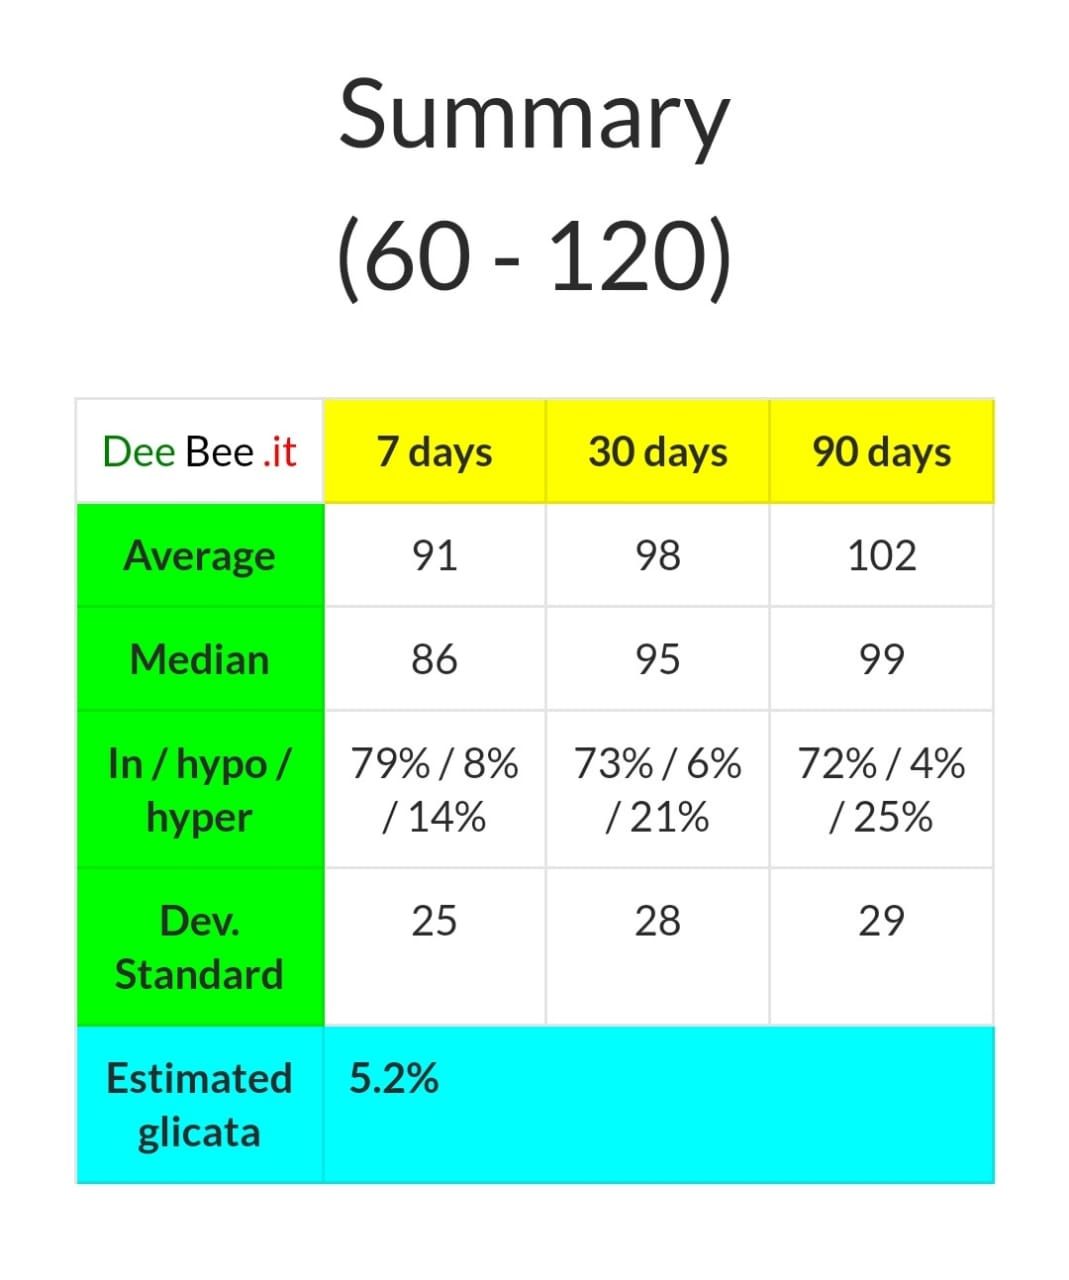
A more detailed version of reports is available if you sync Glimp with the Blue Circle app, available on both Android and iOS.
How to generate 'phone' reports (Blue Circle Diabetes app) :
Once you sync Glimp and the Blue Circle Diabetes app (here's how) > Open the app > Settings > Glimp/Miao Miao > follow the instructions in the screenshots. Once the sync is complete, go to 'Reports'.
Several clinics charge a fee for applying the sensor, downloading (and perhaps discussing) the reports. Some diabetics have unfortunately also paid much more than the MRP for the sensor.
Be aware and do not let anyone fool you to pay substantially more for a product.
Who said travelling with your bionic parts wasn't going to be fun? Read Madhura's account of how four T1s fought with the forest department officials at Tadoba National Park to be able to check their (sugars) libres on their phones during a safari!

Common questions
- Can I scan through clothing?
Yes, you can scan even through thick clothing and layers.
2. Can I bathe and swim with it?
Yes for both, however keep in mind, as per Abbott it is water resistant in up to 1 metre of water and should not be immersed longer than 30 minutes
3. Can I reuse sensors?
No. Even if the sensor comes off before the 14 days are up, it cannot be reapplied.
4. Can I extend the life beyond 14 days?
No, there is no way to do this, unlike with CGMs
5. Can I wear it in an X-Ray, MRI or CT scan?
No, the exposure may damage the sensor.
6. Is it compatible with an insulin pump?
It does not connect with a pump but you can use it irrespective of whether you are on pump or MDI
7. Could I have false readings on my sensor? Why?
You could have inaccurate readings for a number of reasons - dehydration, compression lows, use of certain medication such as ascorbic acid (vitamin C), paracetamol, salicylic acid, among others.
8. Can I apply it at a different location?
Abbott recommends the back of the arm, however many users report fairly accurate readings using it on the thighs, tummy and other areas as well. Of course this is purely anecdotal data.
Happy scanning!
SUPPORT BLUE CIRCLE DIABETES FOUNDATION
We need your help and support to continue to grow, expand and touch the lives of countless people in the diabetic community. Every little bit helps us in sustaining this endeavour.
Click here to donate
